Find the best gifts for 8 to 12 year olds with our top picks for boys and girls—perfect for sparking creativity and fun for kids this age!
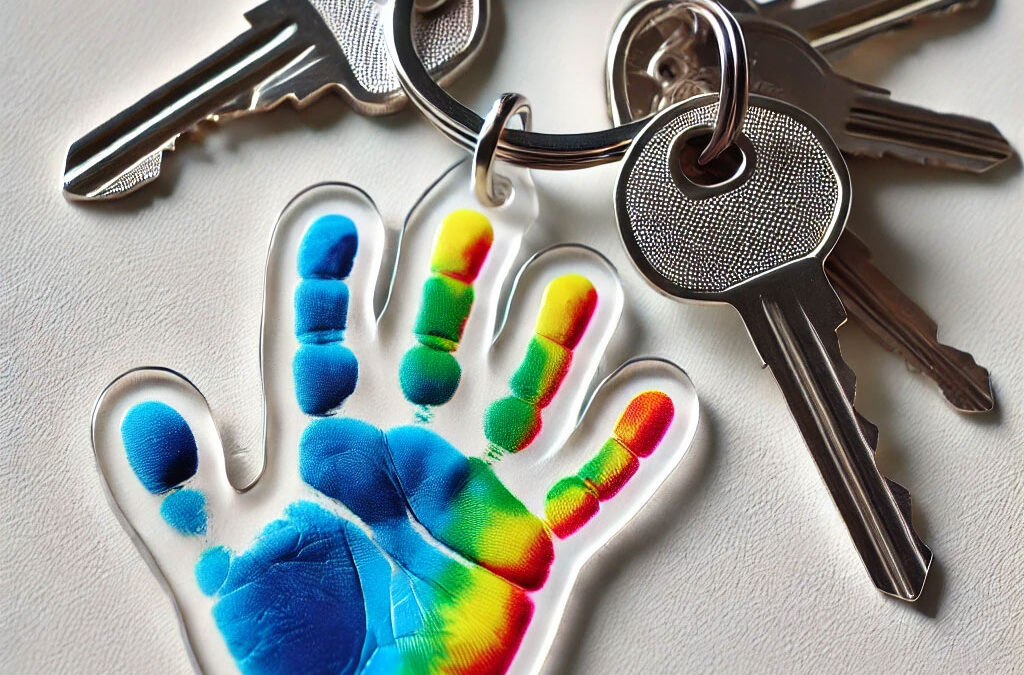
How to Make Handprint Shrinky Dink Keepsakes: Fun Craft for Kids
How to Make Handprint Shrinky Dink Keepsakes: Fun Craft for Kids

Create handprint shrinky dink keepsakes with our complete guide! Learn how to make them and explore fun seasonal designs!
DIY Shrinky Dink Keepsakes: Fun Handprint Ideas for All Seasons
If you’re looking for a fun, creative way to capture your child’s handprint and turn it into a lasting memory, Shrinky Dink keepsakes are the perfect craft! These cute, colorful handprints shrink down into sturdy little keepsakes that make great gifts or decorations. Plus, they’re easy to personalize for every season—think pumpkins for Halloween or turkeys for Thanksgiving! In this guide, we’ll walk you through the supplies you’ll need, how to make them, and offer seasonal ideas to keep this craft fresh all year long.
All activities should be supervised by an adult. As an Amazon Associate, I earn from qualifying purchases. This post may contain affiliate links.

What is Shrinky Dink Paper and Where Can I Get it?
Before we dive in, you’ll need some special shrinking paper. Click here to get your Shrinky Dink sheets and have them ready for crafting some shrinky dink keepsakes!
What is Shrinky Dink Paper? It is a type of polystyrene plastic that has been designed for craft purposes. When heated, it undergoes a process of shrinking and thickening, allowing fåor the creation of smaller, more durable versions of the original design.
Should I follow safety guidelines when using Shrinky Dink Paper? When heating the paper in the oven, it should be done by an adult and it’s recommended to use Shrinky Dink paper in a well-ventilated area. The heating process may release some fumes, and good ventilation helps dissipate any potential odors.
Materials
- Hole Punch
- Keychain or Ribbon (if making keychains)
- Oven or toaster oven
- Baking sheet
- Foil or parchment paper
- Shrinky Dink paper
- Acrylic paint
- Paintbrush
- Permanent markers
- Scissors
- Hole Punch
- Keychain or Ribbon (if making keychains)
- Oven or toaster oven
- Baking sheet
- Foil or parchment paper
Step-by-Step Instructions
Step 1
Start by either painting your child’s hand with acrylic paint or you can trace their hand with a permanent marker, both acrylic paints and permanent markers are the most commonly used art tools used on Shrinky Dink paper, but read the next section for some more compatible options to experiment with. If outline the handprint, consider letting your child fill in the handprint with vibrant colors, or leave it as a simple outlined design for a more minimalist look.
Step 2
Cut out the handprint shape, leaving a small border around the edges.
Step 3
If making a keychain or ornament, punch a hole at the top of the handprint.
Step 4
Preheat your oven to the recommended temperature (usually around 325°F), and line a baking sheet with foil or parchment paper.
Step 5
Place your handprint on the parchment-lined baking sheet and bake for 1-3 minutes. The handprint will curl up and then flatten as it shrinks.
Step 6
Let it cool for a few minutes before handling, and once cool, attach your keychain loop or string.
What Art Tools Can Be Used on Shrinky Dink Paper?
Acrylic paint and permanent markers are two of the most commonly used, but there are several other art tools compatible with Shrinky Dink paper to bring your designs to life. Colored pencils work well on frosted Shrinky Dink sheets, giving a softer, more muted look. For bold, textured designs, oil pastels are another option, though they can smudge before shrinking. Sharpie paint pens offer vibrant colors with precise control, making them ideal for detailed designs. Gel pens add fun metallic or glittery effects, while chalk markers can give a soft, pastel-like finish. For a more dimensional look, you can use deco pens or fabric paint after shrinking to create raised designs or add detailed outlines.
Shrinky Dink Handprint Ideas
Shrinky Dink keepsakes are super versatile and can be customized for different holidays and seasons. Here are some fun ideas to get you started:

Shrinky Dink Handprint Turkey
Classic turkey handprint, with each finger acting as a colorful feather and the palm as the turkey’s body.

Shrinky Dink Handprint Fall Leaf
Color the handprint with autumn shades like orange, red, and yellow to represent a leaf.

Shrinky Dink Handprint Pumpkin
Use the handprint as a base for a pumpkin design. Add jack o lantern features to make it Halloween themed

Shrinky Dink Handprint Fall Tree
Use the hand and part of the arm as the tree trunk, and create colorful fall leaves with fingerprints in autumn shades.

Shrinky Dink Handprint for Valentine’s Day
Read the step by step directions here:

Shrinky Dink Handprint Ghost
Use white acrylic paint and black facial features to make a spooky keepsake!

Shrinky Dink Handprint Easter Bunny
Use the palm for the bunny’s face and the fingers for bunny ears. Add details like whiskers and a little nose.

Shrinky Dink Handprint Christmas Lights Garland
Use different color paint to make handprints and paint a gray bulb end at the base of the palm.
What’s Next?
The Best Gifts for 8 to 12 Year Olds!
read more

Best Learning Toys for Kids
Looking for the best learning toys for kids? We’ve got you covered with this list of educational gifts that kids will love and learn from!
DIY Snow for Sensory Play: 4 Easy Kid Recipes
Learn how to make DIY snow for sensory play in minutes! These 4 fake snow recipes for kids are perfect for home, classroom, or sensory bins.