Explore the best bath toys for kids! Discover the ultimate guide to bath time fun with these top picks that will make every splash memorable.
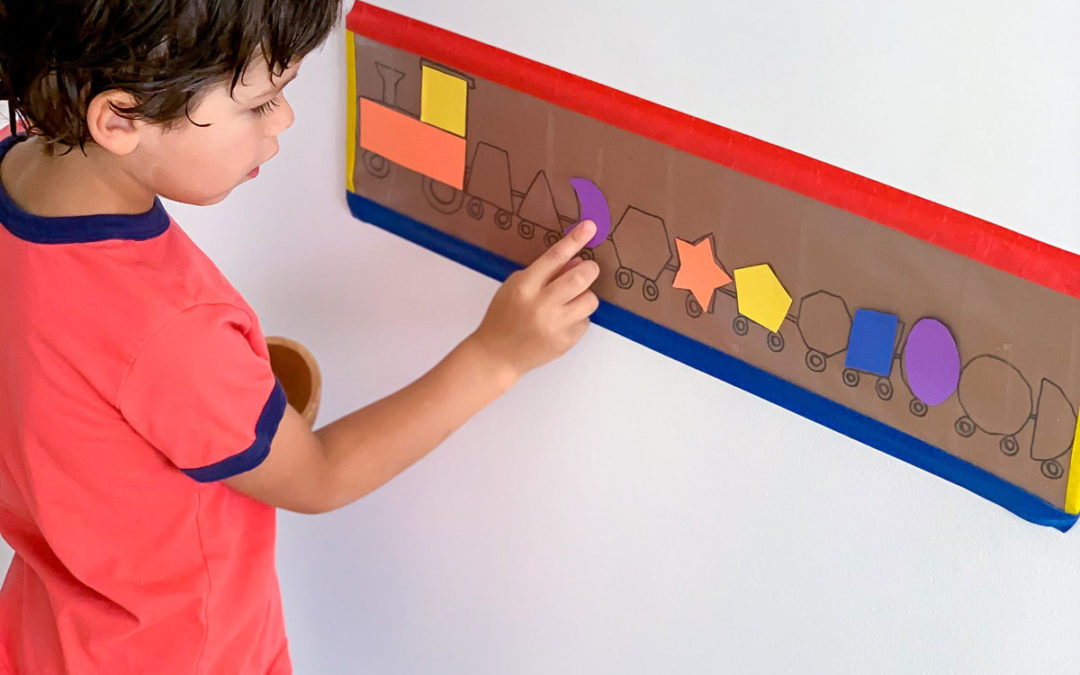
Shapes Activity for Kids – The Shape Train
Shapes Activity for Kids – The Shape Train

This shapes activity for kids is a great way to strengthen shape recognition! Make this puzzle yourself, or download our free printable!
A Shapes Activity for Kids with Over a Dozen Shapes!
This shapes activity is a fun and simple way to help kids understand and learn their shapes. Learning shapes at a young age is excellent for building a strong foundation in math skills and language development. Since everything in the world is made up of shapes, it’s an important topic to help your child grow.
To play, kids have to match the shapes to the shapes on the train or the caboose.
The great thing about this activity is you only need few simple supplies to create this fun shapes activity. If you’re running low on art supplies, check out our comprehensive art list for more ideas!
Short on time? We understand grown ups are busy, so we made a free printable version of this activity! Read on to get it!
Skills:
Ages:
Prep Time:
How To Make and Play With This Shapes Train
This shapes activity for kids is a simple way to help them explore various shapes and also learn how to recognize specific shapes when they see them. This activity will also help them understand the correct names for the shapes as well.
Make sure to watch the video first to see how to make this simple Shapes Train. It will show you how easy it is to create and just how much fun the kids will have when playing with it.

A Train-Themed Way To Help Your Child Learn Shapes
This fun train activity is a great way to help your child learn about their shapes. It’s fun because it can focus on shapes and colors, and all on a fun train!
Older kids can help with this activity as well by helping to cut out the shapes and even draw or make the base of the train.
I set up this activity on a vertical surface. This isn’t necessary, but I often will do this because it has loads of benefits. By making activities eye-level, I’ve noticed how concentration and attention is much more focused, plus it’s great for strengthening arms and shoulder muscles!
All activities should be supervised by an adult. As an Amazon Associate I earn from qualifying purchases. This post may contain affiliate links.
Materials
- Piece of Cardboard
- Shapes to trace (or an excellent eye for hand drawing them!)
- Pencil and Marker
- Piece of Cardboard
- Shapes to trace (or an excellent eye for hand drawing them!)
- Pencil and Marker
- Tape
- Adhesive Paper
- Construction Paper
Step-by-Step Instructions
Step 1
On a piece of cardboard, line up your shape pieces into train formation. You can use a rectangle and square to form the conductor!
Step 2
Trace them with a pencil (you don’t want to ruin your blocks with marks)!
Step 3
Once traced, use a marker to make it bold and add some train details like wheels!
Step 4
Cover the cardboard with adhesive paper, sticky side up (or clear packing tape if you don’t have any!)
Step 5
On the edges, tape the adhesive paper down.
Step 6
On construction paper, trace and cut out each shape for matching!
-17")
Printables Shapes Activities for Kids!
Don’t have time to create this DIY game? No problem! I wanted to make things extra easy for busy grown-ups by providing a FREE printable version of this activity!
Just cut out the shapes and match them to the train puzzle!
We also have a printable bundle All About Shapes! This includes over 25 pages that explore a dozen shapes. From tracing the shapes activities, to matching shapes, building a shape robot, and cutting out shapes. That’s just a few of the many ways this printable will have your kiddo exploring shapes!
For more printable activities, visit our Printable Shop. It is filled with easy to set-up activities that help strengthen early childhood education skills!
The Educational Benefits of This Shape Train Activity
This educational shape activity for kids is perfect for helping them learn their shapes. Once your child learns the various shapes, this can then be used as a foundation for learning math, colors, and even language development.
The shapes can also be counted to work on math skills, and as your child progresses, you can even add some shapes with sight words on them to help with reading skills as well. This is also a great way to have them work on listening skills and matching various colors.
The sticking of the shapes onto the train is excellent for their fine motor skills and hand-eye coordination as well.

The more your child uses this shape train activity, the more learning activities you can add in for them!
The Educational Benefits of This Shape Train Activity
This educational shape activity for kids is perfect for helping them learn their shapes. Once your child learns the various shapes, this can then be used as a foundation for learning math, colors, and even language development.
The shapes can also be counted to work on math skills, and as your child progresses, you can even add some shapes with sight words on them to help with reading skills as well. This is also a great way to have them work on listening skills and matching various colors.
The sticking of the shapes onto the train is excellent for their fine motor skills and hand-eye coordination as well.
The more your child uses this shape train activity, the more learning activities you can add in for them!
More Ways to Explore Shapes
Here are my top picks shape puzzles and toys!

Wooden Block Shape Train
This wooden stacking train is a fun way to combine block play, shape learning, and building! This set comes with the train car and 15 blocks.

Nesting Wooden Shapes Puzzle
This puzzle is perfect for kids as young as 2 years old. The shapes match and nest in each other with vibrant colors.

Wooden Shape Puzzle
This wooden puzzle includes 18 shape pieces a cotton bag. I love that it features so many types of shapes!

Shape Sorting Truck
This versatile shape sorting tooy includes 15 shapes and a laser engraved pull-a-long truck!
What’s Next?
The Best Bath Toys for Kids in 2024
read more
How to Layer a Raised Garden Bed and Make a Trellis
Learn how to layer a raised bed and create affordable trellises for thriving gardens. Explore our guide for expert tips & easy instructions!
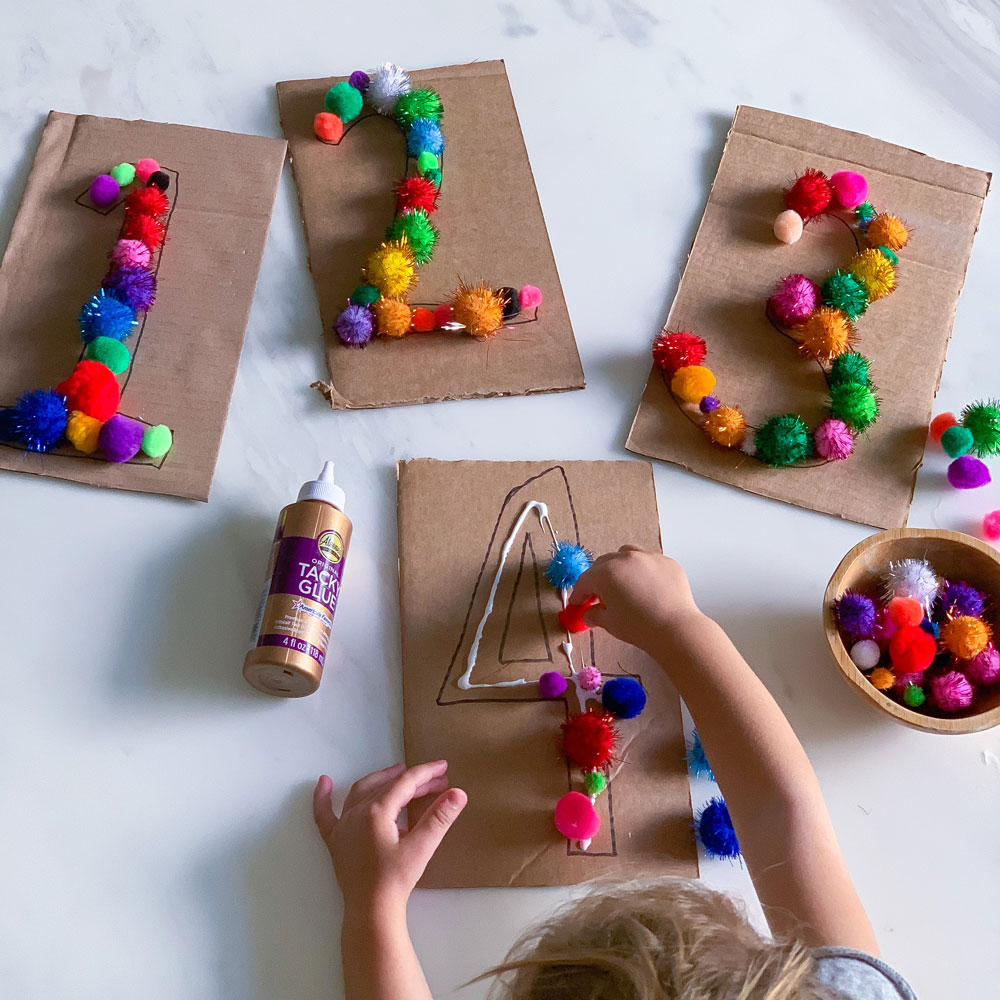
Number Recognition for Toddlers – The Best Activity to Start Learning
Kickstart number recognition for toddlers with this beginner’s activity! Fill bubble outlines with pom poms for engaging hands-on learning.


-05")


_Green-17")